Art Nouveau Illustration and the Kaleidoscope tool

The past couple of weeks, I have been working on an illustration for my parents. My mom is a big fan of Alphonse Mucha, a Czech Art Nouveau painter. Here are my results so far. I took a sampling of different elements and ideas from different works by him. It is similar, but not identical any of his paintings. A lot of the detail gets lost in this tiny image. I will provide a little higher resolution when it is done. The final image is at 16"x50".
Patterns
Before getting to this point, one of the things that was stumping me was some of the patterns in the stain glass area. There is a great tool in Painter X called kaleidoscope painting If you click the link, the last page of the pdf has a good visual on how it works (I couldn’t find anything equivalent for Illustrator or Photoshop out-of-the-box). Look near the bottom of this post for how to make it work.
I played with it in Painter until I got something I liked and brought it over to Illustrator where I vectorized it.
The other part that took a little time was all of the squares that were in the circle. The best solution was to use a pattern brush in Illustrator. It allows the brush pattern to warp slightly based on the path.
Everything else
I sketched the basic design on a conventional sketchpad and scanned it in. I used Painter X to blow up the size and do a more detailed rendering pencil sketch. For the top and bottom filigrees and most of the “frame elements, I used Illustrator to make sure everything was precise. The whole stained glass elements in the circle were all done in Illustrator as well.
I used two different ink weights in Painter X for the effect. A thick one for the foreground areas and a thinner one for the inner areas.
Kaleidoscope tool

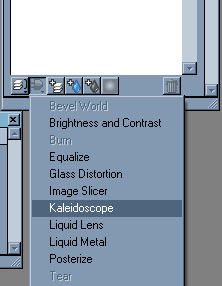
For an explanation on how to use this tool in Painter X, go to the layers window and go to the plugin icon and click Kaleidoscope. It will ask you for a size. This tool always has to be square, so whatever you type in will be mirrored for the height.
The new layer will show a square in the thumbnail area. To make this functionality work, you actually have to paint below the plugin layer. If you try to paint on the plugin layer, it will want you to convert it. Don’t do that! Paint on a layer below to see the results.
The only two things you can do with the plugin layer is move it around with the move tool, or double click it to change its dimensions. Moving the layer around after you have drawn something on a layer below can give some neat results.
Here are a few more examples of the cool kaleidoscope painting that I concocted. They all kind of have the same feel. It would be cool if Corel could change the tool so it could be mirrored with different amounts. The tool is always gives a square layer that is divided into 8 mirrored areas.

Next
Finishing this painting is on top of my list. I will be going back to more programming stuff afterward. I bought a 3d Math book on Amazon. I don’t know if this is illegal or not, but I also found some type of full online version of it here. I hate reading a lot on a computer, so the hard copy will do just fine for me. I am hoping to turn some concepts into learning examples with Unity3D.
Page Contents

I mostly keep this blog to help me remember things. Writing is also a great way to understand things at a deeper level. I would highly recommend it if you don't write at all.