Evolving Your Illustration Workflow through Mental Modeling
Ever since I started my quest a few years back to learn more about color, painting, and light, it appears there are a vast array of options to get to the final result.
Say you just did a line drawing of a scene with a nurse flying through a jungle. If you were to try and paint it, where would you begin? Would you block in the colors first, would you do a wash over the whole painting, a lighting study? What tools and settings would you use?
The amount of approaches to paint are pretty intimidating - especially in the digital world. As part of my learning process, I have begun to study illustrators and painters in a more scientific approach. Scientific meaning that it identifies processes in practical steps and progressions. There are no default formulas for creating a great looking painting.
The post will talk about my studying behavior in trying to improve my painting skills.
Modeling behavior
From what I have read in many books across different disciplines and subjects, the formula for mastery in any given field is relatively the same.
Mental Modeling.
If you want to have the same results as someone, all you have to do is copy and understand their process. If you love the artist Craig Mullins and want to be able to paint similar to that, all you have to do is watch him paint and learn why he uses the tools he does. You won’t “become” him, but you will understand how to produce something that is similar to what you want.
The real key isn’t just to watch him paint, but understand why and how he is painting in that way. Here is a little example of a study I am still doing on an illustrator. Here is an example of how I study.
Video Study - Gonzalo

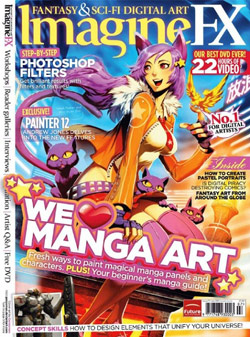
I took a video from the magazine “ImagineFX” and popped it in my PS3. Most of the videos from this magazine don’t have any audio, so it is usually best to watch it at 1.5x speed at the least. This issue has a reported 22 hours of video training. At a liquidation price from my closest Borders, this was a steal. This is the best magazine I have ever seen when it comes to developing and improving your art skills. The illustrator for the cover, Gonzalo, does an entire screen capture of his painting.
The main thing to do is break a painting process into chunks and make additional notes by each point if there is some special technique or information by it.
He seems to work in layers. One layer might be adding highlight to the whole picture. I watch the first few spots he will do the highlights. After that, he repeats the same technique over and over until he covers the whole painting. All of the repetition isn’t as interesting, so I usually will fast forward until it hits a point where he goes to his next step of the process. That seems to be the most efficient way to watch these videos in my opinion.
Here are the basic steps that I noticed while studying Gonzala’s workflow for this painting:
- Make sure dimensions are right size (300 dpi and inches are correct)
- Ink drawing on layer above ( have more line weight variance around face and eyes)
- fill in the silhouette of character with base color and lock the transparency
- draw only light values and fill them in ( do research on Brunaille)
- develop mid tones (use the fade tool to fade back lightness values)
- Use smudge tool for blending (use the three prong brush)
- select each area and do hue/saturation/brightness to change the hue of each area
- Merge layers and do smudging of hair or other parts that you don’t want outlines showing
- Experiment with different lighting with curves tool to create different moods
Other Notes:
- Use lasso tool for drawing areas that will be painted (quicker for doing fills)
- With fabrics, switch to quick mask tool to paint selection
- do white highlights last and don’t smudge them
- when doing fills of highlights, just fill in once (don’t worry about halo, smudge will take care of it later)
I haven’t gone through the other 2 hour painting session where he goes through the background, but you get the idea. Taking notes and trying to create something with his workflow really help understand the process at a deeper level.
An important note that with these steps, they are more specific to things that I picked up and general guidelines. The more you learn, the more you realize how much you don’t know. If I was much better than I was, my notes might look different. The numbered process wouldn’t change too much since that is his progression of how he slowly renders each “layer” of detail.
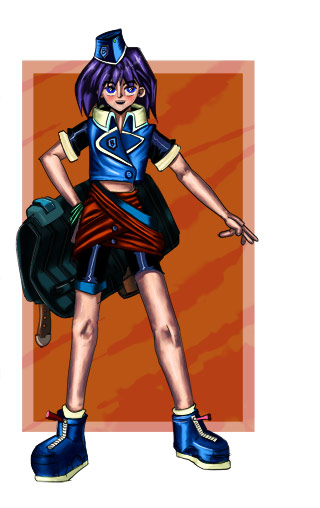
Here is a little painting I did using his workflow. It definitely isn’t the most exciting and dynamic painting I have ever done. But you know what…I learned a lot. That is the most important thing when it comes to mastering a difficult skill.

Conclusion
Art is an extremely deep topic and there is no single “formula” for making something look good. It takes time, energy, and sweat to develop illustrative skills that put you at a professional level. A great way to do that is by modeling and studying accomplished artists and learning from them. It is impossible to not grow when you take this approach. Observing, taking notes, and applying new techniques is the fastest way to become your best.
Page Contents

I mostly keep this blog to help me remember things. Writing is also a great way to understand things at a deeper level. I would highly recommend it if you don't write at all.