Mecanim: Directional Blend Trees + Concept Art For My Game
After installing the update for Unity 4.1 a few days ago, I saw a release note about different types of blend trees you can do with Mecanim. After playing with the different blend state types for a while , I have found that they solve a lot of issues that I struggled with before. They are very powerful and reduce the amount of code dramatically.
[ ]
]
Here is a setup that I am currently using for idle/walk/run/turn.
Yes, that is right. You can do them all with one blend tree.
It is amazing that you can have a single blend state to manage everything. Just create a new blend tree like normal. The idle animation has a blue connection in the image above – indicating that it is the current animation that is playing. It is cool to see it changing dynamically as you test the game. Below is how to set up an 2D Directional blend tree.
[ ]
]
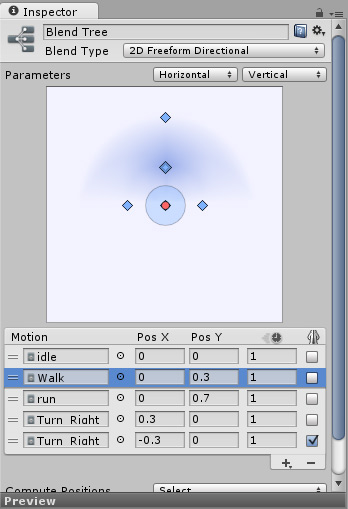
There are different types of Blend trees, but the one that works great for a joystick is the 2D Freeform directional. By the image above, you can see how I have most of it set up. The two parameters at the top are the horizonatl and vertical input. Those are just mapped by grabbing the Input.GetAxis(“Horizontal”) and Input.GetAxis(“Vertical”) and setting them to an animator parameter. the Pos X and Pos Y are the threshold when the animations start. Unity recommends having an idle animation when both axis are zero. I do this in my blend tree as you can see.
You can see that idle happens at 0, walk will be at full force at 0.3, and run will start at 0.7. Values are normalized between -1 to 1. The animations interpolate very smoothly between the different animations.
There are two “Turn Right” animations. The second one has a check mark at the end. This denotes that it is a mirrored animation. It is really only necessary for animations that are done predominantly on one side of the body. If you have a right hand punch, you also have a left hand punch now by just clicking a check mark.
Finally, the last parameter is the animation speed that is associated. Mine are all just set to 1.
If you look at the blue nodes in the graph above the motion grid, you will notice a blue airbrush effect around the selected animation ( walk in this case). This is the area of influence of the animation and how the blending weights will transition for it. Pretty cool.
These complex blend trees allows for some really sophisticated movement without having to worry about managing a ton of different states. All with almost no code. Yes!!
This is just one blend tree, but you can easily create multiple blend trees depending on different parameters. My game for example, has a “isFlying” bool that will determine if the flying movement happens or the ground movement happens. It is easy to maintain when you just have to connect two blend trees together instead of having to manage a spiderweb of animation states. I love Mecanim!!!
8/28/2013 Update I have had a few people ask me for some of the implementation code with how I got this to work.
Here is the basic movement functionality as I have it implemented. I have other code in my class, but my character does a lot more than just idle/walking/running. I am just showing the part of the code that relates to the 2D blend tree.
private Animator animator; private float h = 0.0f; private float v = 0.0f;
//smooth dampening input private float lastHorizontal = 0.0f; private float lastVertical = 0.0f; private float smoothTime = 0.3f; private float hVelocity = 0.0f; private float vVelocity = 0.0f;
void Start() { animator = GetComponent(); }
void Update () { h = Input.GetAxis(“Horizontal”); v = Input.GetAxis(“Vertical”);
 //apply dampening
 h = lastHorizontal = Mathf.SmoothDamp(lastHorizontal, h, ref hVelocity, smoothTime);
 v = lastVertical = Mathf.SmoothDamp(lastVertical, v, ref vVelocity, smoothTime);

if (animator)
    {
	animator.SetFloat("Vertical", v);
	animator.SetFloat("Horizontal", h);

            if ( h != 0.0  ) // if no movement or if game is paused
        {
   	    var rotateAmount = transform.forward + (transform.right \* h \* 0.04f);
	    transform.forward = Vector3.Lerp(transform.forward, rotateAmount, 500);
        }

    }
} }
There isn’t that much to it. Since root motions are applied to the animations, I don’t have to worry about setting any type of speed in code. Setting the vertical and horizontal animator properties will take care of the animation. The only interesting point is that I am not using root motion for any type of rotations. I was having issues with rotations and them affecting other animations, so I removed them.
Concept Art
All this Unity stuff is my feeble attempt to get back into game development after a little break. I have been working on some concept art recently to help motivate me to learn more about game development.
[ ]
]
Story: A young girl is sent to an insane asylum after seeing her family brutally murdered. After having numerous fits of rage and nervous breakdowns, she is diagnosed as legally insane and condemned to a life in solitude. Until…
I have a lot more of the story fleshed out in my mind. The basic idea for the game is that you are a pissed off girl trying to destroy the world. Get ready for lots of explosions and blowing stuff up!
[ ]
]
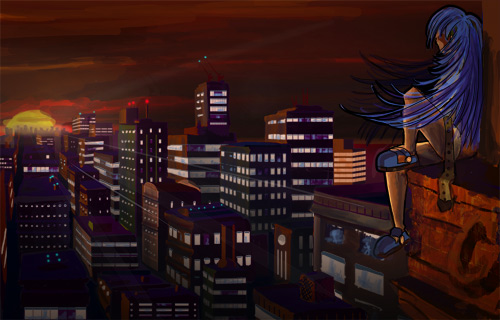
I started building out the 3d city and getting some basic game play mechanics roughed out. I thought it would be cool to have the setting at sunset – kind of foreshadowing that the “end is near”. I was originally thinking to have my target platform be on iOS or an Android tablet, but the controls are quickly getting too complex to support it. I will probably have to opt for desktop or an Ouya.
It is just me doing everything right now, so it will probably take a while to finish. Already have some cool music and sound effect ideas as well. Probably should be concentrating more on the art and programming more. :)
Page Contents

I mostly keep this blog to help me remember things. Writing is also a great way to understand things at a deeper level. I would highly recommend it if you don't write at all.